Preamble
Keycloak provides us a openid compliant single sing on server (SSO). We can use it to authenticate our users. We will then validate its access token to authorize the user.
This gives us the possibility to separeate the front end from the backend. For example using a javascript front end like Nuxt, and a API backend built with Laravel. Additionally, we can reuse the same authentication for many other clients.
Overview
Create a laravel backend
require 'robsontorio/keycloak'
create a keycloak client and configure it
copy the public certificate which is used to valideate the access token
create a user class
put it together
provide the proof
How does it work
This are the essential steps:
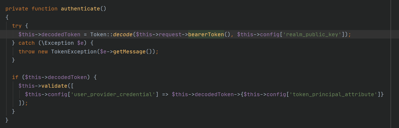
Because the access token is signed by the keycloak server, we can use the public key to verify its signature.
This verification is done by the laravel keycloak guard by
Setup Laravel
composer create-project --prefer-dist laravel/laravel laravel-keycloak
cd laravel-keycloak
configure your webserver (nginx/apache)
create a database
configure .env file
php artisan config:cache
update db migrations
<?php
use Illuminate\Database\Migrations\Migration;
use Illuminate\Database\Schema\Blueprint;
use Illuminate\Support\Facades\Schema;
class CreateUsersTable extends Migration
{
/**
* Run the migrations.
*
* @return void
*/
public function up()
{
Schema::create('users', function (Blueprint $table) {
$table->id();
$table->string('username')->unique();
$table->timestamps();
});
}
/**
* Reverse the migrations.
*
* @return void
*/
public function down()
{
Schema::dropIfExists('users');
}
}php artisan migrate
Create a user witch matches a username in your keycloak
php artisan tinker
$u = new User;
$u->username = 'my';
$u->save();
Add a new client in keycloak, we call it 'test'
Add a client role 'test'
Assign the new role to a user
Evaluate that your access token has resource access to the 'test' client
{
"exp": 1605906828,
"iat": 1605906528,
"jti": "3a67ba8c-d0c4-448d-a3ba-f8399b618a98",
"iss": "http://localhost:8080/auth/realms/demo",
"aud": "test",
"sub": "79c3408b-8f29-4845-99c4-fcaca512f9b6",
"typ": "Bearer",
"azp": "test",
"session_state": "db41b05a-0eef-4d50-a875-311b0221f834",
"acr": "1",
"resource_access": {
"test": {
"roles": [
"test"
]
}
},
"scope": "openid profile email",
"email_verified": false,
"name": "Thomas Liebrand",
"preferred_username": "my",
"given_name": "Thomas",
"family_name": "Liebrand",
"email": "Diese E-Mail-Adresse ist vor Spambots geschützt! Zur Anzeige muss JavaScript eingeschaltet sein!"
}robsontenorio/laravel-keycloak-guard
composer require robsontenorio/laravel-keycloak-guard
php artisan vendor:publish --provider="KeycloakGuard\KeycloakGuardServiceProvider"
Copy the public RS256 key of your realm and add it to your .env file
KEYCLOAK_REALM_PUBLIC_KEY="MIIBIjANBgkqhkiG9w0BAQEFAAOCAQ8AMIIBCgKCAQEAtSeXTY7QhmbK2HGlOibWyUr+4PvSEEXxOs7jl5/gD3e84QUFsgu/TsyRobV1UTInfbcFADkE1n4mU+/NSTNmQnggdMxuoxoIjFizpavoo/CABk0l0xqAw8xUeC8gq3pqHm6Prt3oCxi9eV0kBxBo7oovfQ+0mSWc6ULJVl4jkBe2aeOvYzSpfW5U+7Rwr3ebVZpncxfisto6XF4hgJo+CzIzCIRimYujfhzfI3uiPqJ6L44YEjBhBFMi4tdF2+ErT18GJuW6YcKYZp8OmbLo58rGTgJ7sRxSovBjLzCLLAxsGa51AwmRuyHs/zCmOWmnWCuOru0wRlk1urEAAo0GhwIDAQAB"
KEYCLOAK_ALLOWED_RESOURCES=test
php artisan config:cache
Note, the guard currently assumes a RS256 key, which is the realms default key.
You also only need to copy the content of the public key, as shown above. The token will be wrapped in the token class like:
private static function buildPublicKey(string $key)
{
    return "-----BEGIN PUBLIC KEY-----\n" . wordwrap($key, 64, "\n", true) . "\n-----END PUBLIC KEY-----";
}
Copy the base64 decoded access token and send a request to your laravel backend.
If you have built your front end with nuxt as described here, you can copy the access token from the auth._token.keycloak cookie.
Example in postman
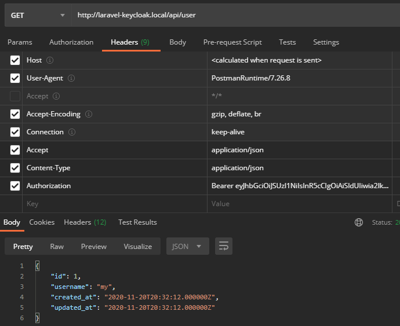
PHP example created by postman
<?php
require_once 'HTTP/Request2.php';
$request = new HTTP_Request2();
$request->setUrl('http://laravel-keycloak.local/api/user');
$request->setMethod(HTTP_Request2::METHOD_GET);
$request->setConfig(array(
  'follow_redirects' => TRUE
));
$request->setHeader(array(
  'Accept' => 'application/json',
  'Content-Type' => 'application/json',
  'Authorization' => 'Bearer eyJhbGciOiJSUzI1NiIsInR5cCIgOiAiSldUIiwia2lkIiA6ICJrNnRkTGFja3dPLUpNdDZLNXR6Y0dxNEV3Wl9RQ3pEUFZnRUlwMU5WVnNZIn0.eyJleHAiOjE2MDU5NDM1MzksImlhdCI6MTYwNTk0MzIzOSwiYXV0aF90aW1lIjoxNjA1OTQyNDc1LCJqdGkiOiJiMDhjMjlmOC03NjI0LTQxYTgtOTU2Ny05MmEyNGY5ZDkyY2UiLCJpc3MiOiJodHRwOi8vbG9jYWxob3N0OjgwODAvYXV0aC9yZWFsbXMvZGVtbyIsImF1ZCI6WyJ0ZXN0IiwiYWNjb3VudCJdLCJzdWIiOiI3OWMzNDA4Yi04ZjI5LTQ4NDUtOTljNC1mY2FjYTUxMmY5YjYiLCJ0eXAiOiJCZWFyZXIiLCJhenAiOiJtZWxkZXNjaGVpbkFkbWluIiwic2Vzc2lvbl9zdGF0ZSI6IjhjYzc1MGJiLTE3ZWYtNDNhZi1hZmVmLTA0NDE0MmJjM2NiMiIsImFjciI6IjEiLCJyZWFsbV9hY2Nlc3MiOnsicm9sZXMiOlsib2ZmbGluZV9hY2Nlc3MiLCJ1bWFfYXV0aG9yaXphdGlvbiJdfSwicmVzb3VyY2VfYWNjZXNzIjp7InRlc3QiOnsicm9sZXMiOlsidGVzdCJdfSwibWVsZGVzY2hlaW5BZG1pbiI6eyJyb2xlcyI6WyJiYXNpYyJdfSwiYWNjb3VudCI6eyJyb2xlcyI6WyJtYW5hZ2UtYWNjb3VudCIsIm1hbmFnZS1hY2NvdW50LWxpbmtzIiwidmlldy1wcm9maWxlIl19fSwic2NvcGUiOiJvcGVuaWQgcHJvZmlsZSBlbWFpbCIsImVtYWlsX3ZlcmlmaWVkIjpmYWxzZSwibmFtZSI6IlRob21hcyBMaWVicmFuZCIsInByZWZlcnJlZF91c2VybmFtZSI6Im15IiwiZ2l2ZW5fbmFtZSI6IlRob21hcyIsImZhbWlseV9uYW1lIjoiTGllYnJhbmQiLCJlbWFpbCI6Im9mZmljZUB0bGllYnJhbmQuY29tIn0.mIv2NZo6Om-Jqv9-eeKR9Zl0C2yu4Au5pvDV1NWj3STaqpD5aND5LsNH4Q0RrpPzLOl9a-Z90l4DRBh-ihkKyruO_2ewcsJm_dDDs_itmPalCcX0gczvVNtFECo3CfVGR_QjkKT1pG1J7DIr--wuiWDZdZ_Ins9RESzxBsm0A2o5qeXjeth23DDZ8TJxtdSYIr4nn9FBLM_QZyghBZvObLVqKAu58KIpYO4hLKVlPJTyvgiZQX7q2cTveYhitPwFh5FtV-8DL0m7cE-KyTAsJIsNSCzxgl53wPgP-OlXtzAQ49xpgfaHgzIih2T-2fix06Q3dXcHrEWEBzjdpPngTg'
));
try {
  $response = $request->send();
  if ($response->getStatus() == 200) {
    echo $response->getBody();
  }
  else {
    echo 'Unexpected HTTP status: ' . $response->getStatus() . ' ' .
    $response->getReasonPhrase();
  }
}
catch(HTTP_Request2_Exception $e) {
  echo 'Error: ' . $e->getMessage();
}
response
{
    "id": 1,
    "username": "my",
    "created_at": "2020-11-20T20:32:12.000000Z",
    "updated_at": "2020-11-20T20:32:12.000000Z"
}
If your token expires, you get an exception like:
    "message": "[Keycloak Guard] Expired token",
    "exception": "KeycloakGuard\\Exceptions\\TokenException",
If you want to see the content of your token, add the following to your .env file
KEYCLOAK_APPEND_DECODED_TOKEN=true
don't forget php artisan config:cache
{
"id": 1,
"username": "my",
"created_at": "2020-11-20T20:32:12.000000Z",
"updated_at": "2020-11-20T20:32:12.000000Z",
"token": {
"exp": 1605943937,
"iat": 1605943637,
"auth_time": 1605942475,
"jti": "cdfe4b61-c8c0-4433-921a-b4b5f957f455",
"iss": "http://localhost:8080/auth/realms/demo",
"aud": [
"test",
"account"
],
"sub": "79c3408b-8f29-4845-99c4-fcaca512f9b6",
"typ": "Bearer",
"azp": "test",
"session_state": "8cc750bb-17ef-43af-afef-044142bc3cb2",
"acr": "1",
"realm_access": {
"roles": [
"offline_access",
"uma_authorization"
]
},
"resource_access": {
"test": {
"roles": [
"test"
]
},
"account": {
"roles": [
"manage-account",
"manage-account-links",
"view-profile"
]
}
},
"scope": "openid profile email",
"email_verified": false,
"name": "Thomas Liebrand",
"preferred_username": "my",
"given_name": "Thomas",
"family_name": "Liebrand",
"email": "Diese E-Mail-Adresse ist vor Spambots geschützt! Zur Anzeige muss JavaScript eingeschaltet sein!"
}
}
Thats it!
A demonstration project is available on my github account
`git clone https://github.com/checkin247/laravel-keycloak.git`
Where to go from here:
The signature algorythm is hard coded into the laravel keycloak guard. This could easely be put into the keycloak configuration instead.
The public key is saved to the .env file. This makes it impossible to rotate the key. If we instead would provide the certificate endpoint on the keycloak server, the key could be fetched and cached. It's also possible to use old certificates for validation only to rotate the key and use the new key for signing new tokens.
If we would like to protect multiple end points, we may be better off using an API gateway and implement the token validation there.